
USE SHAPE LAYERS AND LAYER STYLES TO CREATE THIS 3D EFFECT! | Create a multi-layered, smooth color, UI graphic. | We will learn about adjustment layers, mixing multiple layer styles, smart objects, and more!
In this Photoshop tutorial, we will create a stacked blob effect using shape layers and layer styles. We will work with a beautiful palette of colors and use blurs to create a false sense of depth in our graphics as well. If you do UI design or just like graphic design, this is a good Photoshop tutorial for you!
Download free iOS GUI: https://iosdesignkit.io/ios-gui/
Tags: photoshop tutorial, ui design, graphic design, graphic design tutorials, graphic designer, photoshop ui design, photoshop graphic design, iphone ui photoshop, phone ui photoshop, iphone design, iphone photoshop, photoshop tutorials, Photoshop CC, how to, design tutorial, design tutorials, FEAT
Site Exclusive Tutorial Recording Notes:
Disclaimer: these are the actual notes I used to record this video and are written in a language you may or may not understand. Hopefully, you find them useful or cool.
- Open starter PSD
- Create background fill layer filled with #180a26
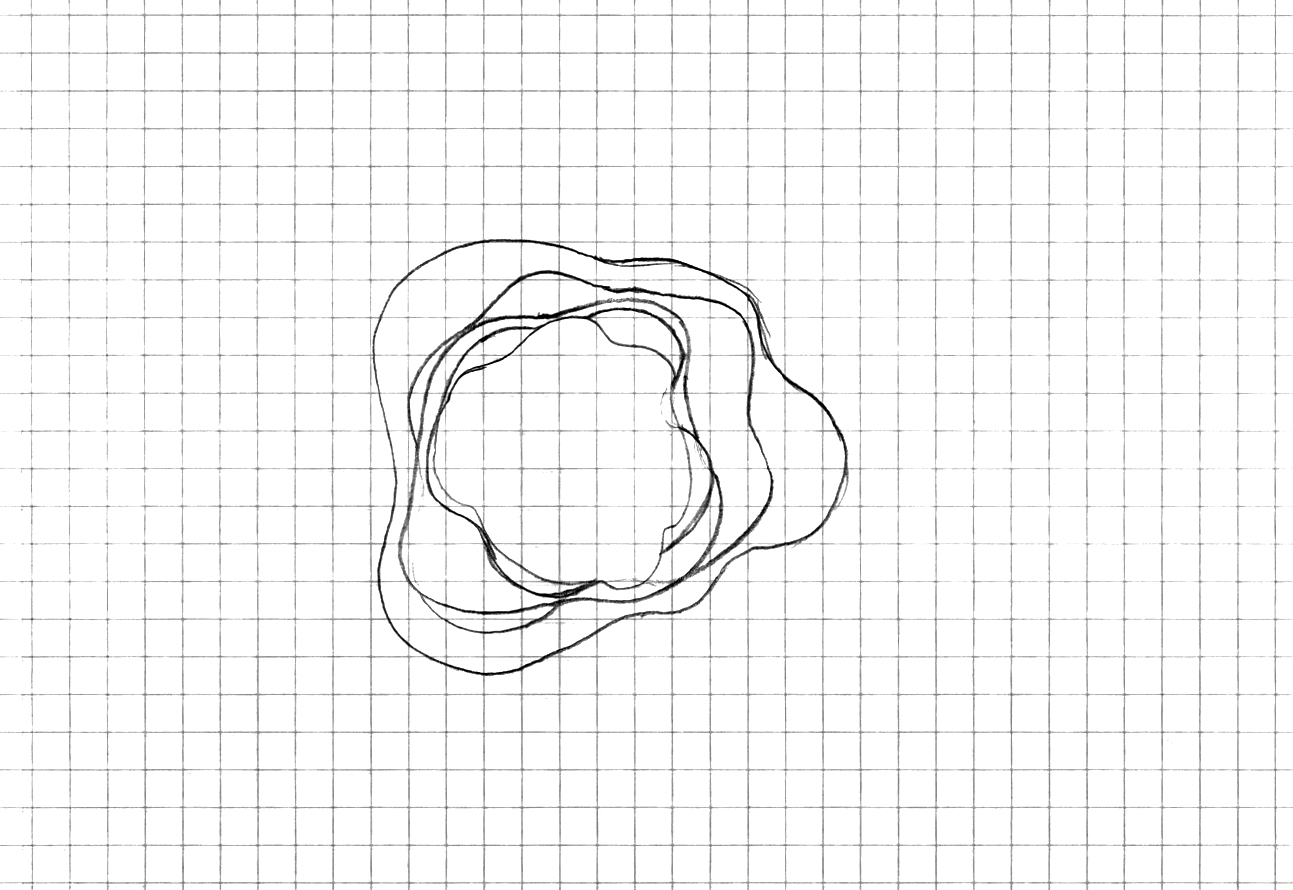
- Drag in the sketch (download that sketch here)
- Use the Curvature Pen Tool and trace each shape of the sketch (5 rings in total)
- Fill all rings with #58476c
- Make each of the rings 10% brighter with the color picker
- Fill the final shape that the circles will sit on with #ff7373
- Give the rear-most shape a Bevel & Emboss: Chisel Hard/150%depth/2px size/1px soften/45º/30º/Overlay/#fffcc9/25%opacity & Multiply/07131f/10%opacity
- Copy that Bevel and Emboss to all five of these shapes
- Also, give that shape an Outer Glow: Screen/10%opac/30pxsize
- Give the front post four shapes a Drop Shadow: Multiply/Black/10%opacity/90ºangle/Distance10px/Spread0/Size15px
- Convert each of these shapes to a Smart Object
- Gaussian Blur back shape 6px
- Blur next shape 3px
- Blur next shape 1.5px
- Blur next shape 1px
- Blur next shape 0.3px
- Create an ellipse shape 225px x 225px, fill with #8f6688 and give it a 3pt stroke set to color #5c6173
- Add Drop Shadow, Multiply, Black, 35%opacity, 45ºangle, 2pxDistance, 4pxSize
- Add a 2nd Drop Shadow, Multiply, Black, 10%opacity, -135ºangle, 3pxDistance, 5pxSize
- Add an Outer Glow, Soft Light, White, 45%Opacity, 30pxSize
- Duplicate that shape and clear the layer styles
- Change size of ellipse to 200x200px and align it center
- Change fill to #514c5e and change stroke to #383f56
- Add an Outer Glow, White, Overlay, 50%Opacity, 10pxSize
- Add Inner Shadow, Multiply, Black, 10%Opacity, 45ºAngle, 10pxDistance, 20pxSize
- Group all the blob shapes and these two circles together in the Layers Panel
- Use “purple-to-green-teal” gradient in a Grad Map layer and clip the layer to the layer group and set to Soft Light
- Add a Color Balance layer: M/+10/-20/+25 || S/-5/-20/+10 || H/+50/-5/-20
- Add Text “68Fº” – Helvetica, Light, 65pt, tracking 40pt, fill with white, set “Fº” size to 30pt, turn on underline for the whole thing
- Set Text to Overlay Blend Mode and duplicate the text 2x
- Select the bottom text layer and add a Gradient Overlay, black to white, Overlay at 45º, 65%Opacity, and 125%Scale
- Add Gradient Fill Layer, 45º angle, tick on Reverse, #ff7069 to #ff7069 and set right handle to 0% opacity, set left handle to 90% opacity.
- Set layer to Color Dodge blend mode and double click gradient thumbnail and drag gradient around to get the perfect fade into the UI
Leave a Reply