
Video
1. Quickly Remove Blemishes
We will begin by opening our image in Photoshop. The better quality image, the better final result you will have. Also bear in mind that every image is different, so consider the technique and why I do what I do here and apply the concepts to your image for the best results.

2. Blemishes
After ensuring you have a nice image out of camera, I like to create a new layer and name it “Blemishes”. I correct any major blemishes (and some small ones too) with the subject’s skin on this layer using the Healing Brush. Simply Alt/Opt + Click to choose an area to sample from and paint over the blemishes. This tool primarily copies texture and blends with the existing color, choose similar skin textures as you are healing the skin. TIP: In order to do the healing on a separate layer check out the control bar at the top of the window and set “Sample:” to “Current & Below”.


![]()
3. Eye Upper Catchlights
Create a new layer and name it “Uppers”. This layer will be to add or enhance the top catch light in the eye. Grab a hard-edged brush and paint two large, white circles where the catch lights are/should be. I had reduced my brush tool to about 40% opacity to add these dots of white. Set this layer to the blend mode “Soft Light”. Add a layer mask and paint away the parts of the catch lights that should not be there. I also reduced the layer opacity to about 60%.


4. Light in the Eyes
Go Layer>New Adjustment Layer>Curves to drop a Curves Adjustment Layer on top of the rest of you layers. Set this layer blend mode to “Color Dodge”. Click on the layer mask provided and hit Cmd/Ctrl + I to flip the white mask to a black mask (hence hiding all that crazy color action!) Grab your Brush Tool and set the Brush Tool to an opacity of 10% and slowly paint light into the colored portion of the eyes.

![]()

5. Dodge and Burn Layers
Create another new Curves Adjustment Layer and set the blend mode to Multiply. Fill that mask with black. Create yet another Curves Adjustment Layer, but set this one a blend mode of Screen. Again, fill the mask with black. We now have a Screen layer which will brighten parts and the Multiply layer which will darken parts. We need to use our Brush Tool and begin painting…

6. Actually Dodge and Burn
Change foreground color to white and set your Brush Tool to the opacity of 10% and grab a very large, soft-edged brush and gently paint over darker areas of your image that you want to darken (on the Multiply layer mask). Do the same for the Screen layer, just this time paint over areas that you want to make brighter. Dodging and burning is a labor of love, you just have to paint a little bit at a time until it looks right to you and you love it!


7. Smooth Dodging and Burning
Select both the dodge and burn layers and duplicate them by using the hotkey Cmd/Ctrl + J. We have now doubled our effect to something far too strong. All we want to do here is blur our mask quite a bit (this will smooth and spread all the dodged/burned edges) and reduce the layer opacity a bit. You can blur a mask by clicking on the mask in the Layers panel and go Filter>Blur>Gaussian Blur.


8. Toning
Getting the tones in your image just right can be hit or miss, but following some simple ideas, you can often get much better results until you train your eye enough to get hits every. single. time. I typically look to reduce contrast overall and then selectively add contrast and depth to the image where I want. Here I’ve added a Levels Adjustment Layer and shifted the handles. See the screenshot to get an idea.

9. Toning Continued
Reducing contrast continues with a few more Adjustment Layers. I went with Curves, Curves, Vibrance, Gradient Map (blend mode of Soft Light!), and Brightness & Contrast. Refer to my screenshots for the settings (or check out the video above.)


10. Merge and Multiply
Use the hidden hotkey trick Cmd/Ctrl + Shift + Alt/Opt + E to merge all visible layers to a new layer. Set this new layer to the blend mode of Multiply.

11. Lift Shadows
This newly minted Multiply layer darkens the image and makes our shadows just a little bit too heavy. Create a new Levels Adjustment Layer and then hold down your Alt/Opt button and hover your cursor between both layers until you see the clipping mask icon appear. Click that to clip the Levels to the Multiply layer below. Use the sliders as I have to boost the black point in the layer. Refer to the screenshot for exactly what I settled with.


12. Relighting
Using two more Levels Adjustment Layers and very soft brushes to mask these layers, I have brightened the top part of the frame and darkened the bottom part of the frame. See my screenshot to see the masks attached to the Levels layers. Use your discretion when deciding how much brightening or darkening should happen.


13.Color Adjustments
Next up we’ll add a Selective Color Adjustment Layer. I have adjusted the “Whites” and “Blacks” in this adjustment to boost the blacks a bit and add some color and punch to whites. See the screenshot for the settings.


14. Pump Contrast
Add a Curves Adjustment Layer and add a very slight “S” curve to pump some contrast back into the image. Fill the Mask with black and paint with white wherever you want the contrast.


15. Double High Pass Global Sharpening
We want to do that whole “Merge all visible layers to a new layer hotkey again”. Desaturate your new layer by hitting Cmd/Ctrl + Shift + U. Go Filter>Other>High Pass and set a number that allows you to start seeing some details in the skin and hair. Depending on how tack sharp your lens is and how well the camera focused on the subject, you’ll have to either enter a smaller or larger number. A sharper image to begin with will need a much lower number. Set this layer to the blend mode of Soft Light. Duplicate the layer by hitting Cmd/Ctrl + J -Reduce opacity a little of the sharpening is overpowering. You can also mask one or both of these layers to more selectively sharpen the image.


16. Film Grain
Learn how I create much more realistic grain by checking this out in the video recording. For now I’ll show you the first step to getting some generic grain though. Create a new layer and go Edit>Fill and fill this layer with 50% Gray. Go Filter>Noise>Add Noise and add about 15% noise (this will all depend on the resolution of your image.) Set this layer to the blend mode Soft Light. Boom! Grain!


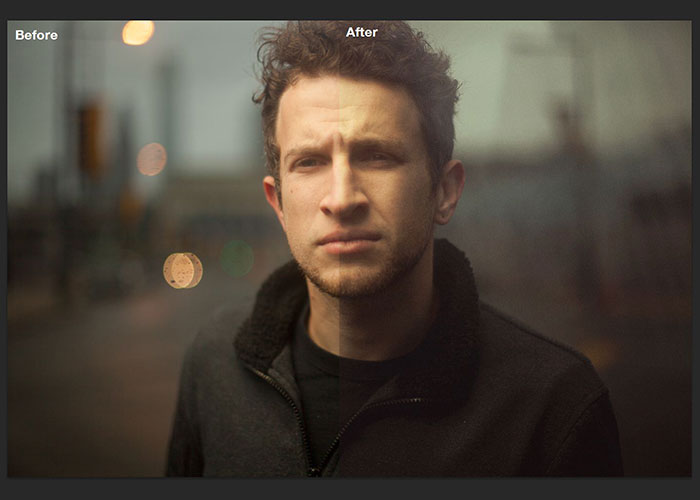
17. Conclusion
That’s it! Starting by removing blemishes, then working with the light in the photograph, then working on the tones, and finally adding sharpness and grain you can effectively polish or make any photo grittier and add a cinematic element to a well shot photograph. This is only the beginning though! Explore the options, push the boundaries and have fun with these Adjustment Layers!
Leave a Reply