
1. The Control Bar
Right there above every document you open rests the almighty Control Bar. This thing is loaded with customization tools and options that make my life easier when working with anything from the Pen Tool and vector shapes, to painting with the Brush Tool and Masking. In a pinch, look at this bar, it always delivers. If you don’t see the bar, click Window>Options and it will appear.
Pro Tip: Look to this bar to adjust opacity or blend modes of individual tools while working on images and graphics in Photoshop.

2. Smart Objects
Smart Objects are simultaneously the most mysterious and maybe most powerful feature in Photoshop. A Smart Object is any layer that you have taken and “wrapped” with this Smart Object thing. Essentially it boxes any layer within it’s own little Photoshop document which allows you to work with it non-destructively, edit it, create multiple instances of the object which all change when one is edited, allow you to scale a pixel object larger or smaller without it getting blurry (as long as you’re not scaling larger than the original size.), and so much more!
Pro Tip: Right click any layer and hit “Convert to Smart Object” to make a new Smart Object. Now any filter you apply to that Smart Object will be editable! Just double click the filter that appears on that layer and you can always change the filter in the future.

3. The Quick Mask
The Quick Mask is the ability to paint a selection using any brush and you can take full advantage of brush opacity and feathered edges. Enter Quick Mask Mode by hitting the letter “Q” and grab a large brush and paint with black as your foreground color. Hit the letter “Q” to convert your painted area into a selection. Double-click the little “Quick Mask” icon below your tools to choose whether you want to paint the selection or paint the area that will not be the selection (I prefer to paint the selection almost all the time.)
Pro Tip: While looking at your new selection, if you need to make an adjustment to it, simply hit the letter “Q” to re-enter Quick Mask Mode and paint with black to add to that selection, or paint with white to remove selection.


4. Adjustment Layers
Adjustment Layers are the essence of non-destructive editing; non destructive editing is a beautiful thing. Adjustment Layers allow you to take nearly any kind of adjustment from the Image>Adjustments menu and apply it, not to the actual layer that you are working on, but apply it as it’s own layer that is “laying on top of” the pixel layers below. This is incredibly advantageous because you can always change or get rid of the adjustment or even apply a blend mode or adjust opacity to make it just perfect. You can get to these by going Window>Adjustments.
Pro Tip: Don’t forget about the mask that each Adjustment Layer comes with! They are incredibly useful.

5. The Mask
When you learn to mask, you learn part of the power of Photoshop itself. Masking is an essential tool to both designers and photographers alike. Masking allows you to “erase” part of your layer by simply covering it up. This is great because as you work in Photoshop you will frequently realize that you need to make adjustments. Here I have masked the Adjustment Layer to only his face making that skin green and nothing else.
Pro Tip: In a mask black covers or hides that layer, whereas white reveals or uncovers that layer. If I paint everywhere with white (in the mask) the whole image will have that same green tint as his face.


6. Levels
We have been Levels thus far in this mash up of my favorite features to make the adjustments you’re looking at. Levels is an incredibly useful adjustment layer (It is also a layer adjustment that you can apply directly to a layer via Image>Adjustments>Levels) and a must learn tool for any Photoshop user. Most commonly, Levels is used to increase or decrease contrast in an image or graphic. Bring up Levels by hitting Cmd/Ctrl + L or apply a Levels Adjustment Layer and drag the top black handle inward to increase black levels, drag the white handle in to add punch to the lighter areas of the image. Boom, instant contrast!
Pro Tip: Use the two handles on the bottom to reduce contrast. Drag the lower black handle inward to lift the black and the lower white handle inward to darker the whites.


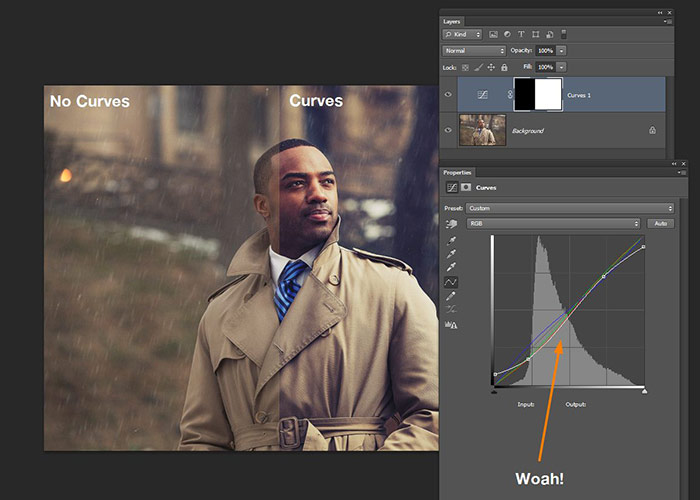
7. Curves
While Levels is the essential adjustment, Curves is that same essential adjustment on steroids. Curves is maybe the single most powerful tool in Photoshop. Curves cannot be explained in a paragraph, instead, check out a full tutorial I did on this feature to start learning about the massive power afforded you with this adjustment.
Pro Tip: Curves has a selection drop down which allows you to work with individual color channels to boost or decrease specific colors without the need for spending massive amounts of time masking specific objects within an image.
8. Reduce Noise Filter
Sometimes there is a subtle yet sublime beauty in some of the simplest features in Photoshop. Reduce Noise is just such a feature. You can find this feature under Filter>Noise>Reduce Noise. Reduce Noise applies a painterly type of blur effect to your image or graphic. Often this effect can be seen in sports photography and even in some dramatic movie-style portrait photography. I will typically use this as part of my process when retouching images. I like to set the strength to 10 and reduce each of the other sliders to zero.
Pro Tip: Duplicate your layer (Cmd/Ctrl + J) and then desaturate (Cmd/Ctrl + U) your layer then add this effect and set that layer to the blend mode “Soft Light” for a cool little effect.


9. The Gradient Map
Adding color to your images can often push them from good images to great images. We want images that scream with greatness. The Gradient Map Adjustment Layer allows us to add cinematic style color images and even allows us to make wholesale color changes to graphic and web design mock ups. Simply add a Gradient Map by going Layer>New Adjustment Layer>Gradient Map. Set a color that you like for the shadows and then a color for the highlights. Set the blend mode to “Soft Light” for most photographs and “Overlay” for most graphic designs.
Pro Tip: Use a simple black to white gradient in your gradient map for a beautiful black and white photograph. Set the black point to a very dark gray for a hazy, faded, washed out black and white looking photo.


10. Brush Jitter
If you are doing photo retouching or custom artwork in Photoshop of any type, brushing and the Brush Tool will be a frequent visitor to your Photoshop life. One amazing feature of the Brush Tool is the “Jitter” feature. Open the Brushes panel by going Window>Brushes and check on “Shape Dynamics” pump the “Size Jitter” to 100% then hit “Brush Tp Shape” and set the “Spacing” to about 200% or so. Photoshop will now randomly jitter the size of your brush as you paint. We will be painting big colored dots.
Pro Tip: Set your brush opacity to 50% and set the layer blend mode to “Color Dodge” and paint with any bright color to start creating a cool bokeh-like effect on your image or graphic.


11. Blend Modes
Blend Modes are amazingly powerful. We have already utilized them several times in this article, but they certainly deserve their own honorable mention here. As your Photoshop skills grow, so will your appreciation of one of the most vital aspects of Photoshop; the mighty blend mode. Use them on layers, brush tools, and even channel mixing/apply image type tasks in Photoshop. For a complete technical breakdown of these things check out this article: http://photoblogstop.com/photoshop/photoshop-blend-modes-explained
Pro Tip: Use Shift + “+” or “-” keys to quickly cycle through Blend Modes when searching for that perfect blend.

12. The Info Panel
While working on almost any project, the Info panel is my go-to panel for instant document and tool information. One thing I love this panel for is for quickly displaying the exact size of my current selection (see screenshot.) You can also jump into the panel option to add all kinds of other valuable information to this handle little panel.
Pro Tip: While using the Free Transform command on any object, check out the Info panel for an instant heads up display of the current and changing size of the object being transformed.


13. Actions (The Good Kind)
I kind of hate actions, but I love them at the same time. Actions tend to make us lazy and actions allows us to wholesale apply other folks systems and processes to our imagery and graphics. Not cool, but super cool depending on how you look at it. Open the Actions panel by going Window>Actions. I love using actions, not for other folks processes, but for taking complex commands I frequently do to my images or web projects and making quick actions out of them. (i.e. My eye retouching technique is about seven layers. My action quickly creates them and their masks for me in seconds.) Use actions wisely and preserve your creativity!
Pro Tip: You can color code your actions and set the Action panel to a “button mode” by hitting the little fly out menu in the top right corner and choosing “Button Mode”. Button mode allows you to apply an action with one click of your mouse. Color coding allows me to more quickly group and choose the action I want to select.

14. Rulers & Guides
When I am designing a website mockup, I lean on rulers and guides in Photoshop like a peg-legged pirate. Guides can be simply dragged out of the rulers which can be displayed by going View>Rulers (Cmd/Ctrl + R) and you can dump any guideline that you have placed by using the Move Tool (V) and just dragging it off screen and dropping it. Use rulers! Use them! They’re really great.
Pro Tip: Set your snapping to snap to Guides by going View>Snap to>Guides to ensure perfect placement when using shape and selection and drawing tools.

15. Opacity
Opacity, while very simple, is too important a feature not to include it. Without opacity there are heaps of tasks that would be incredibly difficult. Opacity, simply put, is the ability to fade a layer anywhere from being 100% solid to 50% see-through, to 10% see-through, to 0% which means your layer has completely disappeared. To get an idea of layer opacity grab a selection tool and drag a selection across an image. Create a new layer and fill it with white. Reduce the opacity to 75% and now you have the makings of a brand new website! (Maybe even blur the background image a little for added effect.)
Pro Tip: To quickly increase or reduce opacity hover your cursor over the word “Opacity” and note that your cursor turns into a little arrow. Drag left or right to quick change the opacity level.


Leave a Reply