
The Brightness/Contrast adjustment is one of the more simple adjustments that you can perform in Photoshop, but most people who I’ve seen using it don’t use it to its fullest effect. In this tutorial, I’ll show you how to increase contrast by “decreasing” contrast and building a deeper and more cinematic based look with the Brightness/Contrast adjustment. We’ll also touch on adjustment layers and how to use them as well.
Graphicstock.com is our sponsor! Check out the deal for tutvid.com readers right here!
1. Adjustment vs. Adjustment Layer

Before we jump right into talking about Brightness/Contrast there is an important distinction between applying an adjustment right to the layer or using an Adjustment Layer. Adjustment Layers allow you to apply your adjustment as its own layer which you can always go back and tweak, reduce the opacity of or even add a blend mode. Adjustment Layers are much better than just applying any adjustment directly to your layer or image.
2. Brightness & Contrast

With your brightness slider you adjust whether the image gets lighter or darker. With the contrast slider you can pump up the contrast in your image, or reduce the contrast. Pro tip: Reducing contrast-while it sounds like a bad thing right off the bat-can often add lots of detail to your image by revealing information in the shadows and highlights of your image.
3. Increase Contrast by Decreasing Contrast

I added a Brightness/Contrast Adjustment Layer to this image and I’m going to pump up the brightness in the image here, but I’m going to decrease the contrast levels to bring back some of the detail while still having an overall increase on the image’s contrast.
4. Adjustment Layer with Blend Modes

I’m adding another Brightness/Contrast Adjustment Layer and I set the blend mode to Soft Light and reduced the contrast slider a bit and also reduced the opacity of this Adjustment Layer to tone down the contrast that the Soft Light blend mode is pumping into this image.
5. Reduce Contrast when Color Grading
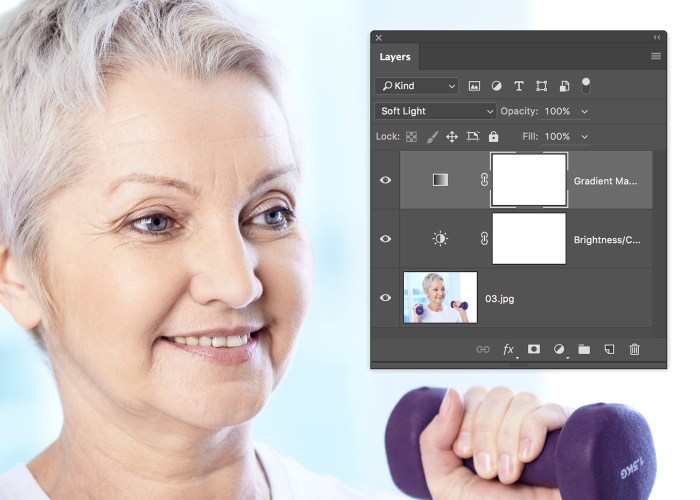
One of the big times that I’ll use this Adjustment Layer is before I drop a Gradient Map onto my image. A Gradient Map will increase contrast because I set my two gradient colors in the Gradient Map and then I set that Adjustment Layer to the blend mode Soft Light. By adding a Brightness/Contrast Adjustment Layer below the Gradient Map Layer, I am able to reduce contrast pro-actively because I know that the Gradient Map is going to pour contrast back into my image.
6. Adjustment Layers are Non-Destructive!

The beauty of using Adjustment Layers when you’re making these brightness, contrast, and tone/color changes in an image is that you can always go back and adjust the opacity or exact settings of that Adjustment Layer. As I said back at the beginning, Adjustment Layers are much better than just applying any adjustment directly to your layer or image.
Check out the video at the top of this post to see even more detail about this tool and how you can use it more effectively! Sign up for my newsletter and stay up to date with all the tutvid.com happenings! Thanks for checking this tutorial out!
Leave a Reply