
We all know about the Photoshop faux pas, techniques like trying to smooth skin by blurring it, or the good olde Over Retouching of the eyes that will so often leave our subjects looking like they’ve been subjected to the most awful of death-ray-esque lasik eye surgeries, and of course merely using the lowly Image>Adjustments>Desaturate is an awful way to create black and whites when you have the power of Gradient Maps or the Black and White Adjustment Layer. Let’s instead take a dive into some other techniques that you should avoid using in Photoshop and maybe we can both expand our knowledge of this brilliant piece of software. To kick things off, let’s look at the number one thing to avoid!
1. Bevel and Emboss

Among the worst things you will see created in Photoshop, the classic Bevel and Emboss effect applied in its default state might be one of the worst. The trick is to use this effect to create shadows OR highlights that will wrap and flow with your artwork. Of course, as you play with the effect, you’ll find more and more uses. It’s just that horrible default state that is so dreadful.
2. Selective Color

There may not be a more universally looked-down-on technique than the isolated/selective color effect where the whole image is converted to black and white except for one object. It’s generally just a terrible effect and I wish I had a good piece of advice to help you make it look better. This effect will make your project, photo, or portfolio look a little less professional.
3. Over-Whitening Teeth

We all want whitened teeth, but we don’t really want WHITE teeth. It’s important that as you desaturate teeth and brighten them that you don’t completely bleach them white and brighten them so much that they start looking solid white. It’s always a good idea for the natural tooth color of the subject to shine through. Think of teeth whitening as a process, not an instant solid-white-tooth-making change.
4. Exporting any Code for Web Design

You can export HTML code from Photoshop and you can also right-click on almost any layer and choose to “Copy CSS” which will allow you to get the CSS code used to build that object on the web. The code is almost always bad (more than 95% of the time) so you probably don’t want to use this technique. If you’re serious about your web design, invest your time and effort and learn to write code. You will be so glad you did.
5. Too much HDR/Unsharp Mask/High Pass/Clarity
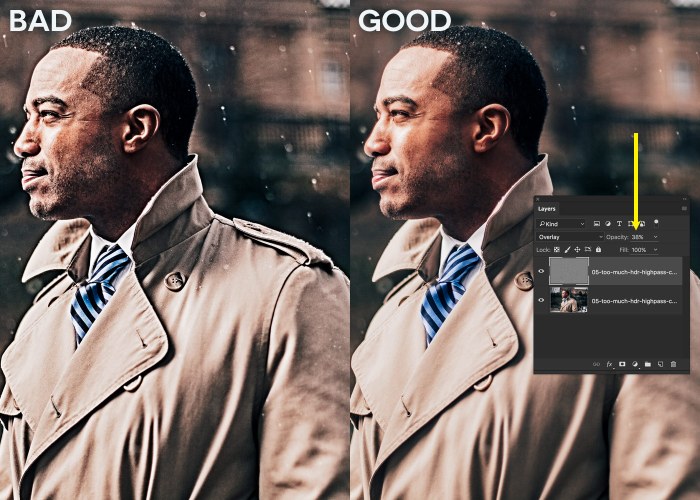
You can use tools like the Clarity slider or Unsharp Mask to add a bit of midtone punch to any image. The problem is, often we forget to actually stop adding that midtone punch and we’re left with an image that is roughly half-photo, half-halo. Not the best look. The key here is pretty simple: Take it easy with the Clarity slider, with HDR, with High Pass effects, and with Unsharp Mask. Use that Opacity slider in your Layers panel to really dial in your effect to get the perfect amount. Not too much, not too little. Just right.
6. Retouching Directly on a Layer

Ouch! Don’t do this! When you want to retouch an image and remove some blemishes, etc… create a new layer first and use your Clone Stamp, Patch tool, and Healing Brushes to sample on all layers (setting for this is in the top control bar that runs across your screen) and paint the retouching bits on the new layer. This way you can easily mask the work you’re doing or get rid of it if the client so wishes.
7. Applying Adjustments to a Layer

Same as above, don’t do this! In almost every case it’s a much better idea to use an Adjustment Layer to apply an effect to your image in Photoshop. Go Layer>New Adjustment Layer and choose the adjustment you need and you will get the same dialog box you would have with the standard adjustments under Image>Adjustments. With Adjustment Layers you can reduce the opacity of a layer, mask it to just one part of the photo, or change the blend mode of the Adjustment Layer to create a cool effect.
8. Applying Filters Directly to a Layer

You also do not want to apply your filters directly to your graphics and images in Photoshop. Right-click on any layer you wish to apply a filter to and choose “Convert to Smart Object” before you apply a filter. When Photoshop adds a filter to a Smart Object, it uses a “Smart Filter” which appears in the Layers panel and you can always go back and adjust or delete later on (even if you have saved or closed the file) if you think it needs to be done.
9. Not using TypeKit!

If you are a subscriber to Creative Cloud, instead of spending endless hours and dollars searching for the perfect font face, check out the Typekit array of fonts that are available free through your Creative Cloud membership! Go Type>Add Fonts from TypeKit and browse the library of fonts and simply sync whatever fonts you want to use with Photoshop and they will appear in your font drop down menu almost instantly.
10. Bad Selection Edges for a Composite

This one should go without saying, but it is an issue that you will see in many, many composite images posted online. The difference between a clean-edged, complex selection that perfectly blends the edge of the object you’ve cut out and a selection that leaves the maddeningly annoying 1px white edge is the difference between mediocre work and top-notch professional work. I did a tutorial all about advanced edge selection. Check it out for more info. (Disclaimer: I was using the Refine Edge command in that video, not Select and Mask.)
Leave a Reply