Create a Fancy Dimple Background Texture – Photoshop Tutorial
Subtle patterns are all over the web these days and without a good grasp of the techniques used to create these sweet, snappy, subtle little patterns, you may find yourself up the river without a paddle when you need to create a pattern!
Let’s jump in and create a dimpled, hole-punched, car-seat style background texture in Photoshop and save it as a Pattern so it is easy to access and use in the future!
Step 1:
Star by creating a new Photoshop Document size 10px by 12px at 72 pixels per inch.
Step 2:
Hit Cmd/Ctrl + 0 to zoom our tiny file all the way in to 1600% or 3200%. Go Edit>Fill and choose to fill it with 50% gray.
Step 3:
Go Window>Info to open the Info Panel and watch the “W:” and “H:” area. Grab the Elliptical Marquee Tool and draw out a small circle 4×4.
Step 4:
Go Layer>New>Layer and name this new Layer “Dimple”. Fill this shape with Black by going Edit>Fill and choosing Black as your fill. Hit Cmd/Ctrl + D to deselect and grab your Move Tool (V) and move the shape one pixel to the left and one pixel down by clicking your respective arrow keys.
Step 5:
Now go Layer>Layer Style>Drop Shadow and use the settings I have.
Step 6:
Duplicate this Layer by hitting Cmd/Ctrl + J and use the Move Tool (V) to shift this shape down until it is tucked into the bottom right corner of the Photoshop Document.
Step 7:
Select your Background Layer and drag it to the trash can in the Layers Panel. Go Edit>Define Pattern and give your pattern a name.
Step 8:
Now create a new Photoshop Document using the size settings I have.
Step 9:
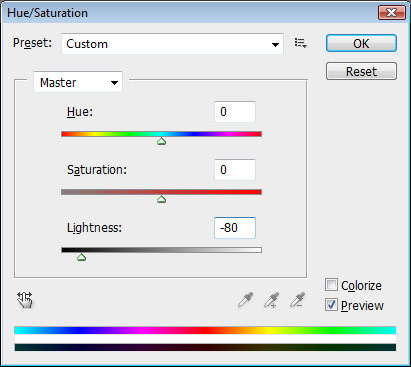
Go Image>Adjustments>Hue & Saturation and set the Brightness to -80%.
Step 10:
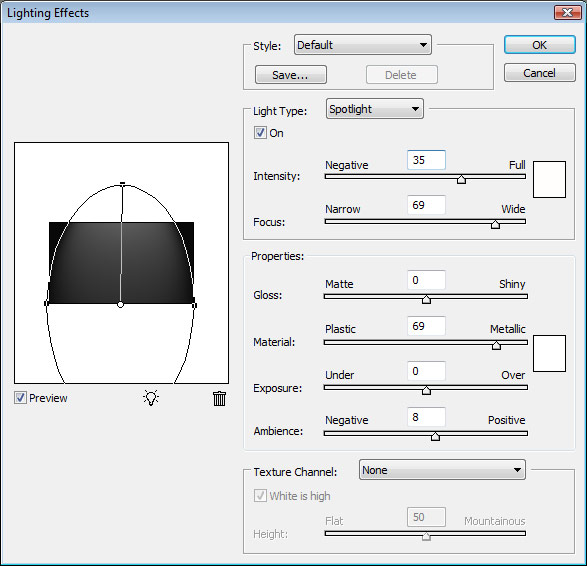
To add a little shape to our background go Filter>Render>Lighting Effects and use the settings I have in the screenshot.
Step 11:
Create a New Layer and Fill it with Black. Go Layer>Layer Style>Pattern Overlay. Choose our pattern and use the settings I have. You will now have a very subtle pattern appearing.
Step 12:
Reduce that Layer’s “Fill Opacity” to 0%. Effect is complete!


Leave a Reply