
Download RAW Files For This Tutorial »
How To Retouch a Group Photo

Let’s jump in and look at how to retouch a group photo taken with natural light. It’s best to shoot your photos in the best quality that your camera can. If your camera can shoot in the RAW format I highly, highly recommend shooting in that high quality.
RAW Images Are Best

This is a photo from my younger sister’s college graduation a little while ago. It was shot on my parent’s front lawn in the middle of the afternoon. You can download the files here in this tutorial as well.
RAW or JPEG Works

The workflow we’re going to follow in this tutorial works if you have a RAW image or even if you’ve shot in JPEG. We need to get our image into Photoshop. If you have a JPEG just open it right up. If you have a RAW image, open it in Photoshop and hit the “Open Image” button in the Camera RAW dialog. I’m opening the “go-sis.CR2” RAW file.
Examining Our Image

When we open the photo the first thing I notice is that one of my brothers has his eyes closed. We’re going to have to bring a new head into this photo which means we’ll need to adjust two photos for light, tone, color, and contrast in Photoshop and then patch a new face onto him. I also want to get rid of the frisbee sitting in the front lawn and also crop the image a little bit. Check out my screenshot to see what I’m thinking.
Convert to Smart Object
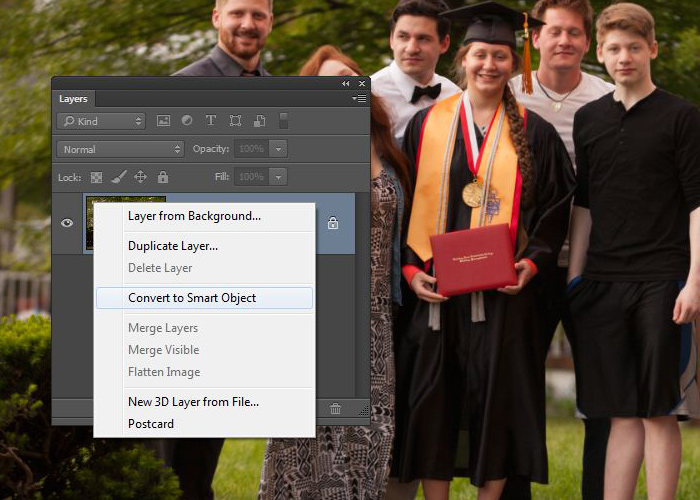
The first thing we need to do is convert our image to a smart object. Right click on the “Background” layer in the layers panel and choose “Convert to Smart Object”.
The Camera RAW Filter

Now that we have a smart object we can go Filter>Camera Raw Filter and it will bring our Photoshop image into the Camera Raw editor that we just saw. (This way even a JPEG in Photoshop can have easy access to the Camera Raw editor too.)
Temperature and Tint

Go ahead and set the Temperature to “-10” and the Tint to “-25”.
Lighting and Contrast Adjustments

Next we’re going to kill off a bunch of contrast so we can have more control of contrast here in the Camera Raw editor. Here are my settings: Exposure: +0.70, Highlight: -60, Shadows: +40, Whites: -60, Blacks: +50.
Clarity in Moderation

Next I’ll boost the Clarity and reduce Vibrance a little bit. Clarity: +5, Vibrance: -30.
The Tone Curve

After that, we’ll turn to the Tone Curve tab. You want to drag the bottom left anchor point straight up like I have in my screenshot.
Pouring in the Contrast

Now, before we adjust and tweak the colors, let’s head back to the basic tab and pull the Contrast slider all the way up to “+100”.
Split Toning and Adding Color

Once we get the contrast blasted into place, we’re going to jump over to the Split Toning tab and here are my settings: Highlights Hue: 50, Saturation: 20, Balance: 30, Shadows Hue: 320, Saturation: 30. This adds a nice faded color effect to my photo that I kinda dig. You can tweak your photo or leave this out altogether if you so wish.
Tone Curve Tweaks

I’m going to jump back into the Tone Curve and add a second point just by clicking on the line and drag down a little bit to darken the image and add a tiny bit more contrast. See my screenshot to see what I did.
HSL and Grayscale to Shift Colors


Next we’ll go to the HSL / Grayscale tab and swing the red hue to the right. Red: +15 and then in the Saturation tab we’ll reduce the red saturation a bit. Red: -20.
Creating a Camera RAW Preset

Next we’ll make this a Camera Raw preset so we can quickly add all these adjustments to our other image before we import it into Photoshop. Go over to the Presets tab and hit the new preset at the bottom of the panel. I used the name “_______preset” for my preset so it would appear at the top of all the other presets. Also see the screenshot for all the settings I am saving.
Applying the Preset

Hit the “OK” button to commit the changes and return to Photoshop. NOTE: You can always come back and tweak these settings later on. Open the “seth-face.CR2” RAW file you downloaded from me and bypass the Camera RAW editor and then convert it to a smart object and add the Camera Raw Filter. Then go and apply that “_______preset” that we just made. Hit “OK” to get back to Photoshop.
Two-Up Vertical

Next go Window>Arrange>Two-Up Vertical.
Dragging From Document to Document

Grab the Move tool (V), hold down the “Shift” key, and drag the “seth-face” image from that document to the other Photoshop document.
Reduce Opacity and Adjust

We can now close the “seth-face” document. Name each layer that you have by double-clicking on the layer name in the layers panel. I named them according to their file names. Select the “seth-face” layer and reduce the opacity to 50% by using the slider in the layers panel.
Lining Everything Up

Grab the Move tool (V) again and drag the “seth-face” layer until you see his eyes and face lining up well. I lined his nose up since his eyes are closed in the one photo. TIP: Zoom in if you need a closer look!
Mask It All Away

Increase the layer opacity back to 100%. Go Layer>Layer Mask>Hide All. Choose white as your foreground color and paint with a soft-edge brush where you want his face to be. Paint with black if you accidentally reveal any other unwanted areas of the “seth-face” layer image.
Non-Destructive Blemish Removal
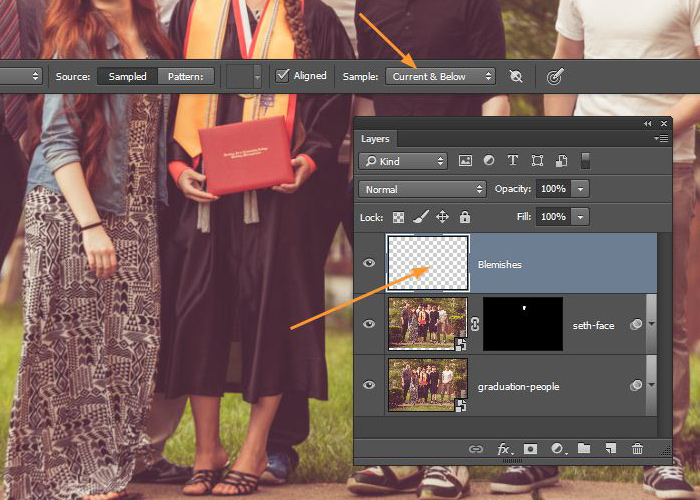
At this point we will create our blemish layer and heal away pimples and unwanted things in the photo before we sharpen and crop. Create a new layer and name it “Blemishes”. Grab the Healing Brush tool (J) and look to the toolbar and set the Sample to “Current and Below.
Clone Out Details

Now hit Alt/Opt to sample areas similar to the grass in the front lawn and paint to cover that lawn toy laying there. We can also zoom in on some faces and remove pimples if we need to with Photoshop here.
Sharpen! Sharpen! Sharpen!

Now to sharpen! Hit Cmd/Ctrl + Shift + Alt/Opt + E to merge all visible layers to a new layer. Then go Image>Adjustments>Desaturate to convert this new layer to a low quality black and white.
High Pass Sharpening


Next go Filter>Other>High Pass and choose “1.3” for the radius and hit “OK”. Set that layer to the blend mode of “Soft Light” over in the layers panel.
Cropping and the Crop Tool

Next grab the Crop tool (C) and drag out your desired crop. Look to the toolbar and ensure that the drop down menu is set to “Original Ratio” so you can maintain the original shape of the photograph. That’s it! We’ve done with this tutorial!
Leave a Reply