
[sociallocker id=8471]Download Tutorial Files Here![/sociallocker]
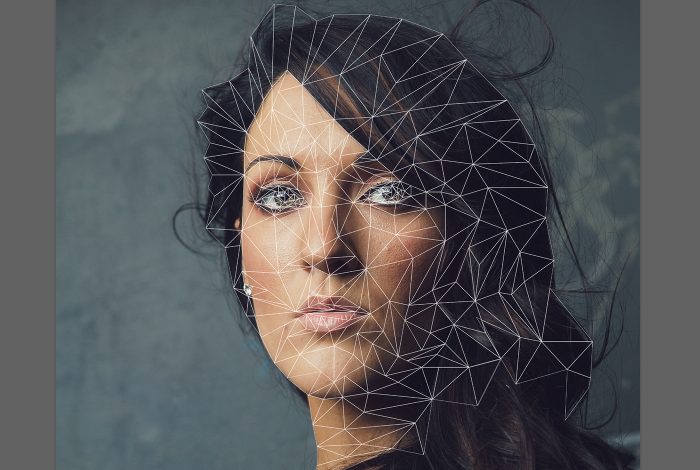
In this tutorial we’ll take a look at the very popular low poly effect. We’re going to create this effect using ONLY Photoshop and it will be a path-based illustration as well. Later in the tutorial we’re going to add a background behind our illustration and [sociallocker id=”8471″] you can download the image used right here. [/sociallocker] If you have trouble following the written tutorial, make sure you watch the full video above and follow along to create your very own low poly effect!

Step 1: Adjust Your Preferences
Use the hotkey Cmd/Ctrl + K to open the Photoshop preferences and choose “Guides, Grids, & Slices” and set the color of the grids to Light Red and choose to set a gridline every 10 pixels with only 1 subdivision.

Step 2: Set the Pen Tool
Grab the Pen tool (P) and look to the top menu and select “Shape” from the drop down menu on the left. Set the fill to nothing (red slash) and set the stroke to the color white and set the weight of the stroke to “0.5 pt” or so (this will depend on how large your image is.) I also like to select the cog wheel and tick the “Rubber Band” mode on (this will show me where my path is in real time as I draw it).

Step 3: Turn On your Grid
Go View>Show>Grid to get your grid to appear then make sure View>Snap is checked on and go View>Snap To>Grid to check that on.


Step 4: Start Drawing Triangles
The trick here is use the Pen tool (P) and click right on where grid lines come together and the snapping will ensure that the path anchor point is dropped exactly on that point and start drawing triangles (not squares or complex shapes, triangles only!) over areas of the same color. Try to draw your triangles over areas that have the same complexion so when we start coloring these shapes everything looks proper. I’ve created my first 25 shapes here along the hairline. NOTE: As you draw each shape should be on it’s own Shape Layer in your layers panel. TIP: After you draw a triangle and join the path ends, hit the Enter/Return key to deselect that path so you can work with a new path.

Step 5: Continue Building Out Shapes
Here I’ve continued downward toward the eyes creating triangle after triangle. When you get near areas of higher detail like the eyebrows or the eyes themselves, it’s important to add more smaller triangles to ensure you get all the details and your final result will be recognizable.

Step 6: Details in the Eyes!
As we build our shapes into the eyes, it’s very important to focus on creating smaller triangles to get all those details and have a pair of realistic looking eyes for our finished project which will go a long way toward making this portrait recognizable.

Step 7: Finish the Face
Finish drawing the triangles over the rest of the face. Again, it’s important to try to draw your triangles along areas of natural couture, a triangle for a highlight and then one for a shadow and so on. This will give you a much better result when we color these shapes.
Step 8: Trace out the hair
Now we’ll create the shapes needed for the hair. I used slightly larger triangles for the hair because so much of it is nearly the same color. This also helps speed up the process a little bit. Just make sure you slow down and add additional triangles where they are needed so you don’t compromise the overall finished artwork.

Step 9: Continue building the shapes
I’ve worked my way down the front of the model and have almost completed the process of creating triangles. You’re probably fairly tired of creating triangles at this point, I know I am!

Step 10: Add the last triangles
Finish off the triangle grid that we’ve created on top of our model and get ready to begin coloring this thing in!


Step 11: Start Coloring
Now comes the fun part! We get to color all of this in and watch as the artwork comes to life before our very eyes. Grab the Direct Selection tool (A) and select the first shape that you created in the Layers panel. Now select the stroke thumbnail and hit the “slash” icon to get rid of your stroke and then choose the fill thumbnail and click on the little color picker icon in the top right corner and use the eyedropper tool that appears to select right in the middle of the triangle shape we’re filling. Hit “OK” and you’ll have filled your first triangle. TIP: Select all your shape layers over in the Layers panel and choose the stroke thumbnail and hit the “slash” to get rid of all the strokes on every shape to save yourself some time.

Step 12: Color the Forehead
I’m going through and adding color to all those original triangles on the forehead.

Step 13: Add Color to the Eyes
Now zoom in and use the same method to add color to the eyes as well.

Step 14: Add Color to the rest of the Face
Continue with this technique and add color to the rest of the face.

Step 15: Add Color to Hair & Everything Else
Work your way through adding color to each shape and feel free to tweak the color a little bit if you feel you need more darkness or brightness in any given shape.

Step 16: Checking for Spaces
I’ve created over 600 shapes so I selected all of the layers and hit Cmd/Ctrl + G to group them into one big layer group. Now and add a layer beneath this layer group by selecting the layer group and holding your Cmd/Ctrl key down and hitting the new layer icon at the bottom of the Layers panel. Fill this layer with white to find any holes in the illustration.


Step 17: Woah! Lots of little lines!
With this white background we can see that there are lots of little white lines between all of our shapes. We can correct this very easily by right clicking on the layer group and choosing “Convert to Smart Object” (don’t worry! all of those shapes are still within this Smart Object!) and then hitting Cmd/Ctrl + J two times to duplicate the Smart Object on top of itself. This thickens up those edges and gives us a perfect looking low-poly effect.

Step 18: Vector & Working with the Smart Object
You can also resize it as large as you like because it is path-based in Photoshop which is a type of vector graphic that will not distort as you scale larger or smaller. NOTE: You will need to double click to get within the Smart Object to scale the actual group of vector paths. Just scaling the Smart Object will result in some deterioration. I grouped all three Smart Objects into a new Smart Object by selecting all three layers and selecting “Convert to Smart Object”. NOTE: You can always double click and get into any of these Smart Objects that we’ve created.


Step 19: Creating the Background
Now we’ll take this pure, simple, polygon artwork effect and drop in onto a new background and add some lighting effects just because we need a little more work to do. You can download a photo I shot of the Tennessee state capitol building a few years ago right here and open it in Photoshop, add a new layer, and go Edit>Fill and choose the “50% Gray” from the drop down menu.


Step 20: Adding Noise & Shapes
Go Filter>Noise>Add Noise and add 100% of noise with monochromatic checked on. Next, go Filter>Pixelate>Mosaic and set the cell size to 100 pixels square. Then open Levels by hitting Cmd/Ctrl + L and drag your black and white sliders inward until the left input reads “105” and the right input reads “150”. This will increase our contrast. Set that layer to the blend mode “Overlay” and hit Cmd/Ctrl + J to duplicate the layer to boost the effect.


Step 21: Illustration, Color Balance, & Levels
Drag the Illustration into the new background and I added a Color Balance Adjustment layer to add a few drops of purple and blue to the shadows and some yellow/red to the highlights as well. I used a Levels Adjustment layer to reduce a touch of the contrast in her hair as well. I held down my Alt/Opt key and hovered between the Adjustment layers and the layer below to clip these Adjustment layers to just our low poly illustration.

Step 22: Light Streaks Base
Cmd/Ctrl + click the thumbnail of the illustration layer to load the low poly illustration as a selection and then add a layer just beneath the illustration layer. Set your foreground color to #5b88bf and go Edit>Fill and choose to fill with the foreground color. Duplicate this blue layer by hitting Cmd/Ctrl + J.


Step 23: Blurring to add Streaks
Next, go Filter>Blur>Motion Blur and blur this on an angle of -45 and a distance of 1000. Shut off the lower blue layer by hitting the eyeball icon in the Layers panel and then grab the Brush tool (B) and choose a 70px, soft edged brush and set your foreground color to white. Now paint perfectly straight lines along ridges in the blurring as I’ve done. TIP: Click in one spot to add a dot of paint and then hold down Shift and click where you want a straight line of paint to go. This will allow you to paint perfectly straight lines. Hit Cmd/Ctrl + F a few times to smooth it all together and get a streaky effect.

Step 24: Blending and Blurring
Set that streaky blur layer to the blend mode “Color Dodge” and then select the other blue layer and hit Cmd/Ctrl + F to apply one Motion Blur to it. Set the lower blurred blue layer to the “Overlay” blend mode.

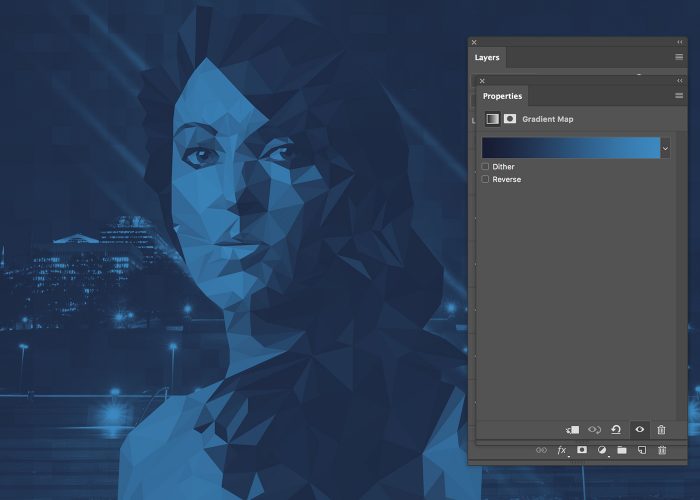
Step 25: Finishing Touches
Add a Levels Adjustment layer and really reduce the contrast by pulling the black and white Output Levels sliders inward a little as I have in my screenshot. This prepares us for our next Adjustment layer which is a Gradient Map Adjustment layer. I set the gradient to run from a dark blue (#1f2134) to a much lighter blue (#5b88bf). Next set the layer blend mode to “Soft Light”. You can reduce the opacity of one or both of these latest Adjustment layers to perfect the effect as well.
I hope you’ve enjoyed this tutorial! If you have, please leave a comment below or follow me on Twitter to keep up with all the new articles and tutorials on tutvid.com! Thanks!

BONUS TIP:
There are some decent and free applications that you can download which do most of the difficult work for you when creating low poly artwork. Personally, I still would rather do the leg work myself so I have full control over the shapes, sizes, and colors that are being used in the final piece of artwork, but these applications do a pretty worthy job and could be worth checking out. I have them listed below:
DMesh: http://dmesh.thedofl.com/
I ♥ ∆: http://somestuff.ru/I (there is a download link located beneath the video.)
Leave a Reply