
Let’s have some fun here and learn about channel-based selections to displace an American flag over this guy’s face and then use Levels, Curves, Color Balance, and a number of methods to adjust contrast, tone, and color to create this epic looking poster image.
Download the images used in this tutorial here Model: https://unsplash.com/photos/QPE5988qVoM Flag: https://unsplash.com/photos/ydA3tWXdzZw
1. Calculations Time!

Download both of the images I used in this tutorial using the links above. Open the portrait image in Photoshop and go Image>Calculations. We want to apply the Red channel to the Red channel using the blend mode Add and set the Offset to -65 and a Scale of 1. We want to output this as a new channel. This will create a new alpha channel which we will be able to load as a selection later on.
2. Creating the Channel Selection

Go to your Channel panel (Window>Channels) and select the new “Alpha 1” channel to view that channel. Hit Cmd/Ctrl + L to bring up the Levels adjustment dialog box and we want to adjust this channel so his face is pretty bright while as much of the rest of the image is as dark as possible. I’m going to drag the black slider up to about 15, the midtone slider left to about 1.30, and the white slider left to about 245.
3. Painting it Black

Grab the Brush tool (B) and paint every area in this alpha channel solid black except for the face area that we just brightened up.
4. Painting it White

Again, with the Brush tool (B) look to the top control bar and set the blend mode of this brush to Soft Light and set your foreground color to white and paint a pass or two over his face to just brighten this area up. Pro tip: By setting the brush to the Soft Light blend mode, you can paint and only adjust the contrast of a specific area without getting white color all over our nice solid black background.
5. Be Careful of What You Select

When working in an alpha channel, you’re not adjusting or tweaking the pixels in your image at all, you’re only working on that new channel which is little more than a fancy selection. To get back to working on our image, we want to select the “RGB” composite channel at the top of our Channels panel and then click on the eyeball for our new alpha channel to shut it off and get rid of any weird color overlay that you will see.
6. Preparing the Displacement Map

Go back to the Layers panel and then look to the top of your screen and choose Image>Duplicate and give this new image a name of “displacement”. This will give us an exact copy of our PSD image file.
7. Continuing to Prepare the Displacement Map

Next, go Image>Adjustments>Desaturate and also go Filter>Blur>Gaussian Blur and give it a 15px blur. Save the file as a PSD (very important!) anywhere on your hard drive that you wish. NOTE: We will need to import this PSD later on as part of the Displace distortion effect that we will apply.
8. Placing the Flag

I am going to drag the flag stock photo into my PSD and go Edit>Free Transform and rotate the flag around and also use the anchor handles in the corners of the transform box to resize the flag as I have to place it right over the model’s face. TIP: You can right click within the transform box and choose to flip the graphic horizontally or vertically as well.
9. Displacing the Flag

After the flag has been dropped into place and we’ve gone ahead with our free transformation, we’re going to want to displace this flag and make it conform to his face a little bit more so this effect will look more realistic. Go Filter>Distort>Displace and choose that PSD that we saved as I typically like to keep everything in here as default and it tends to work pretty well. When you hit “OK” you will be prompted to find your displacement file. Load in that PSD that we had saved out earlier and it will distort the flag.
10. Blend Mode that Flag!


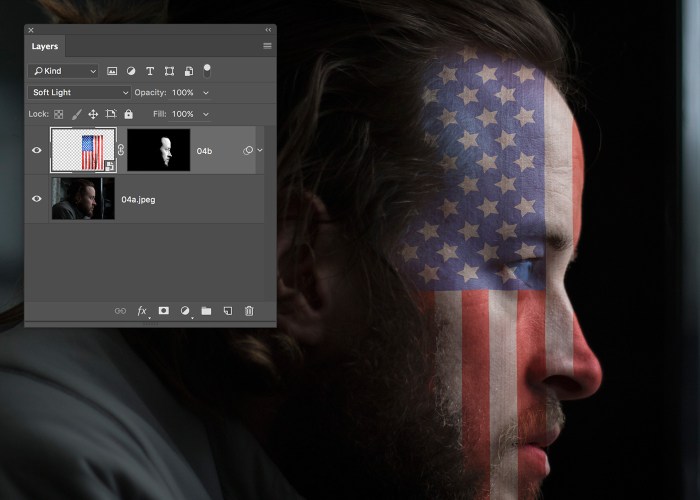
Flip back over to your Channels panel and Cmd/Ctrl + click the thumbnail for that new alpha channel to load that as a selection and then go Layer>Layer Mask>Reveal Selection and then set this flag layer to the blend mode Soft Light.
11. All the Color Effects & Stuff

For the rest of this tutorial and all the color effects and how we really pull this effect together, check out the full video tutorial located at the top of this article. Thanks for checking this out!
Be sure to watch the video at the top of this article tutorial for even more detail and info on how I used this technique and really finished this effect and got great results!
Sign up for my newsletter and stay up to date with all the tutvid.com happenings! Thanks for checking this tutorial out!
Leave a Reply