Do you need to get an amazing selection of hair in Photoshop? In this tutorial, I’m going to walk you through a very fast, relatively easy, and-most importantly-very effective way to make complex selections like a frizzy head of hair in Photoshop. I consider this a “basic-advanced” selection because the model is standing in front of a solid colored background without all kinds of light and color differences that we need to work with. You are going to love this video!
1. “Easy-Difficult” Background Selection & Extraction

This image that we’re working with today is what I would consider an “easy-difficult” selection to extract this model and get a great selection of her hair. We’re going to use some powerful techniques to get an amazing result to cut her out and get a great selection of her hair.
2. Calculations!

Go Image>Calculations to bring up the dialog box. This feature is for blending channels and helping you create complex selections. NOTE: I am only concerned with selecting her hair with this tool, we can use the Quick Selection Tool or the Pen Tool to select her body/clothing. With Calculations, I am looking to make her hair completely white or black (we can easily invert black to white with Cmd/Ctrl + I) For this image I want to set my channels both to Blue and use the Blending mode of Multiply. I also ticked on both “Invert” boxes to make the hair area white. Hit OK to create this new channel.
3. Cleaning Up the Selection

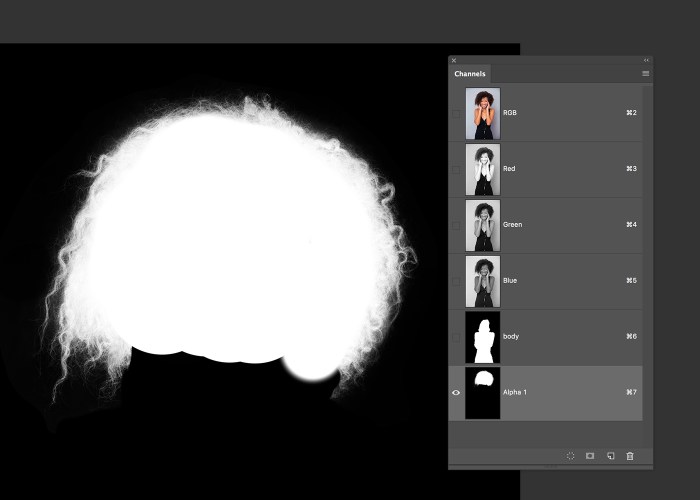
We are working in this alpha channel, not on the actual layers of the image so don’t worry that you’re messing things up! Grab the Lasso tool (L) and drag a selection around just her hair without dragging your selection over the edges of her hair. Check out my screenshot to see where I selected.
4. Invert the Selection and Fill

Invert that selection by going Select>Inverse and then go Edit>Fill and choose Black from the drop down menu to fill all the stuff other than the hair and the hair edges with black. This is essentially isolating our hair selection. NOTE: Everything else in the image should be easy to select with other tools/methods.
5. Magical Brush Strokes

Grab the Brush tool (B) and set the blend mode of the Brush tool (look to the top toolbar and change the blend mode up there) to Soft Light and set your foreground color white and gently paint over the existing white that makes up the area of her hair. The Soft Light blend mode is allowing us to paint and virtually only affect the color that is the same as our foreground color.
6. Continue Brushing

Switch your foreground color to black and paint around outside of the hair to clean away any halos and areas that should not be bright out there. Switch back and forth and keep gently painting white over her hair and black around her hair to get a smooth, but precise edge. (This just takes time and practice to know when to stop tweaking and painting.)
7. Load the Channel as Selection

I have her hair now as a channel that I can load as a selection and I also created another channel by saving a selection I created with the Quick Selection tool which will select her body. Load each channel as a selection by holding down Cmd/Ctrl + Shift and clicking on that channel thumbnail. You can load both selections and they will merge together by using this technique.
8. Add a Layer Mask

With your selection active, click on the RGB composite channel at the top of the Channel panel and then switch back to your Layers panel and go Layer>Layer Mask>Reveal Selection to create a mask for your selection and knock away all the stuff around our model. Watch the video above for MUCH more detail!
Image Composited Over Different Background

Be sure to watch the video at the top of this article tutorial for even more detail and info on how I used this technique and really finished this effect and got great results!
Sign up for my newsletter and stay up to date with all the tutvid.com happenings! Thanks for checking this tutorial out!


Leave a Reply