Video
1. Shoot Clouds!
The first thing you should do is carry a camera with you as much as you can and shoot clouds all the time. I find that shooting toward the horizon (not straight up!) with a wide angle lens (24mm or wider) lends the best results. Get out there and keep your camera handy (and shoot them in RAW.)

2. f16 Is Better
If you are in control of shooting your images, it makes sky replacement a whole lot easier if you’re capturing an image that is sharp through and through. I try to shoot at f11 or higher (like f16) when my ambient and strobe light(s) can handle it. It all depends on your lens focal length though, just keep in mind: The more that you have in focus, the better.

3. Image vs. Sky
The more you replace skies, the more you will gain a feel for what works and what doesn’t. Try to make sure that your sky doesn’t clash with your original image. If your image is wider angle and you place a zoomed photo of a cloud in the sky it’ll probably look funny. Of course it may look funky and cool too, so always be ready to break the rules! Typically having clouds or a pattern of clouds that appear to be long and thin or moving toward a point in the horizon work best (shooting wide angle helps pronounce this effect.)

4. Creating The Selection
There are a million+1 ways to create a selection in Photoshop. This isn’t really a selection tutorial, but we’ll take a moment and explore how I do this. I typically make my selection before even picking out a sky I want to use. I love painting selections using the Quick Mask mode, but for our purposes here we’ll use the Quick Selection tool (W). Grab a rough selection of the area to be replaced. NOTE: My selection isn’t perfect, see the screenshot, but don’t worry about making it perfect… yet.

5. Getting Perfect
Zoom in on the troublesome areas and size down your Quick Selection tool and hold down your Alt/Opt key to subtract from the selection and begin cleaning things up.

6. Continuing To Refine
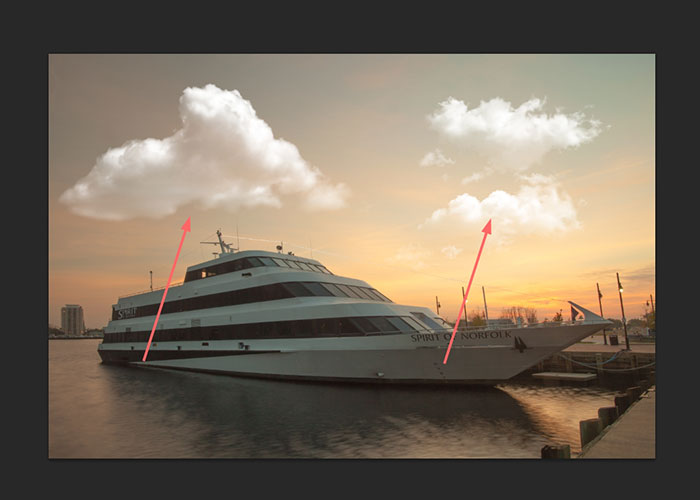
With the amount of intricate details in this photo we will need to find another tool to finish refining this selection. We would try the “Refine Edge” command, but in our case with these poles and wires it will not do the trick. We need to hit the letter “Q” to bring up our Quick Mask and that will “fill” our selection area with this snazzy pink/red color. I’ve drawn arrows to all the areas I need to get in and clean up. Grab the Brush Tool (B) and paint with black wherever you want to select and paint with white to “paint away” the selection.

7. We Have Our Selection
Take some time and really touch up and check on your edges, some photos take longer than others and there is no sure-fire, works-every-time, perfect-in-30-seconds solution, despite the amazing features Adobe gives us in each release of Photoshop. Tip: Take your time!

8. Load The Selection
Hit the letter “Q” to load your selection. Go Select>Save Selection and name the channel “Sky”.


9. Find The Sky
Find an image of the sky that you like and drag it into our Photoshop document and drop it on top of our image.

10. Transform The Sky
If the perspective or layout of the sky doesn’t quite fit your image, feel free to go Edit>Transform>Distort and drag some perspective into your new sky as I have done. Commit those changes when you’re happy.

11. Mask It!
Go Select>Load Selection and load the “Sky” channel. After that, go Layer>Layer Mask>Reveal Selection.


12. Refine The Mask
Select the mask we just created over in the Layers panel and grab your Brush tool (B) and set the foreground color to black by pressing the “D” key. Set the Brush to an opacity of 20% in the toolbar and gently paint black on the mask to hide sky where it needs to be toned down in those trouble areas. Paint with white to fill sky in where it is needed.


13. Rasterize The Sky
We don’t want this to be a Smart Object any longer. Go Layer>Smart Object>Rasterize. Also, set that layer to the blend mode “Soft Light”.

14. Motion, Action, Long Exposure Fake
Ctrl/Cmd Click your layer mask to load it as a selection. You should now have a selection around your sky. Click on your new sky layer’s layer thumbnail to make sure you’re editing the sky, not the mask. Go Filter>Blur>Radial Blur. Set the blur method to “Zoom” and set the amount to “40”. Drag the little point in the zoom preview to where you want the clouds to streak off to. I know the sun was setting right around that point. NOTE: This little preview is only taking into account our selection, not the whole image.


15. Increase Sky Contrast
Go Layer>New Adjustment Layer>Curves and tick on “Use Previous Layer To Create Clipping Mask” and then add a simple “S” curve to increase the contrast in the sky. I am also going to play with the color channels to boost the sky color too. If you’re not sure how to work the color channels in Curves, just throw a Color Balance adjustment layer (Clipped!) in there and play with the colors that way.


16. Touch Ups
I’m going to dust up the mask for the adjustment layer to ease the contrast and color changes on a few parts of the sky.

17. Finish Retouching Your Photo
All that is left is for you to finish the retouching!


Leave a Reply