
Watch: Create a Panoramic Image
The Photos

It all starts with the photos. You want to shoot a good series of images, typically from a leveled tripod. Check out this tutorial on how to shoot a panoramic image. TIP: It’s a good idea to shoot your panoramic images in portrait orientation as well because this will give you a MUCH larger image with more to look at. I did not do that with the shots for this tutorial because I want to have a smaller pano that everyone’s computers could handle assembling.
You can download the JPEG files and follow along with this tutorial right here!
Photomerge


Go File>Automate>Photomerge to bring up the Photomerge dialog box. We’ll hit the “Browse” button to grab all of the JPEGs that we’re going to merge. I’m also going to choose “Auto” as my layout choice and I’ve also ticked on “Vignette Removal” and “Geometric Distortion Correction”. Hit “OK” to let Photoshop do it’s work.
Examination & Cropping
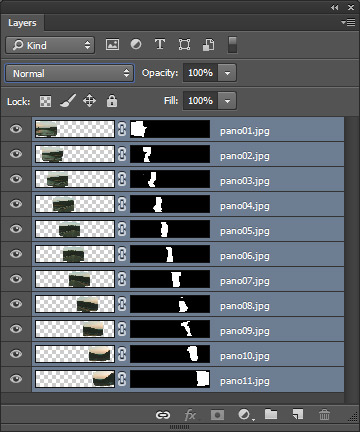


You can see that we have a very wide image consisting of a layer for each frame of the photo in this panoramic image. Grab the Crop tool (C) and rotated it a little to clip away the transparent edges by dragging the transform box in from the edges.
Touching Things Up


If we check out the corners, we can see that there is some additional filling that we need to do to fill out the entire image. We want to use Content-Aware Fill to do this. We need to first merge all of these layers to a new layer for the Content-Aware Fill to work. Hit Cmd/Ctrl + Shift + Alt/Opt +E to merge all layers to a new layer. Make a small selection around any areas that need to be filled in and go Edit>Fill and choose “Content Aware” from the “Contents” drop down menu.
Blemishes


To heal any small markings or areas where the photo is obviously stitched together, grab the Healing Brush tool (U) (Not the “Spot Healing Brush”), and start sampling and painting away blemishes and stitch areas until you have a perfect looking panoramic image! I added a quick lomo effect via a Curves adjustment layer as well. I have a short tutorial on how to do that right here!
Leave a Reply