
In this joint After Effects AND Premiere Pro tutorial, we’ll be covering everything you need to know to create a timelapse video sequence from a series of images or Camera Raw images in After Effects and even how to add animation to create false cinematic camera movement in your shots to add drama. We’ll also pop the clips we render out of After Effects right into Premiere and export a quick video click.
Begin with a new composition in After Effects

In After Effects you want to go Composition>New Composition and choose a width and height that you need for your project. I went with 2580 x 1080 (2.39 ratio is a movie-style widescreen.) I also set the duration of my composition to 30 seconds.
Importing a sequence of RAW images

Go File>Import>File and navigate to where your images are on your hard drive and choose the first image in a series of images (you want to name them with a sequence number so After Effects knows to import the whole sequence) and select the Options button and tick on the “Camera Raw Sequence” and then hit the “Open” button to import the images as a sequence. After Effects will then open the Camera RAW editor (when you import RAW files) and after you choose “OK” it will load a sequence of images. You can drag this sequence from your Project panel down onto the timeline to begin animating the sequence.
Resize the image sequence


The likelihood is that when you drag your image sequence onto your timeline you will need to reduce the size of it. You can do this by pressing the “S” button on your keyboard to bring up your scale options in the timeline and reduce the size of the sequence to fit our composition size.
How to animate in After Effects with Scale, Rotate, and Position


You can use the hotkeys “S”, “R”, or “P” to open the scale, rotate, or position settings for this image sequence. I’m going to open positioning (P) and will be adjusting the X axis to make the image look like it’s subtly sliding across the screen (this would make the shot look like the camera was sliding while taking the timelapse shot). Before we change the X axis number we need to click on the stopwatch icon to create a keyframe in our timeline and then move the playhead to the point at which you would like the slide effect to stop and then change the X axis number and After Effects will automatically place a new keyframe here and animate between both of these keyframes. Check out the video to see exactly how I did this if you’re having trouble.
Exporting video from After Effects


Once we have our sequence doing some kind of slow, subtle animation to fake the dramatic camera movement, we need to export a video file. Go File>Export>Add to Render Queue and go Window>Render Queue to open that dialog box and you can choose the Output Module and change the settings in that options dialog box and then choose the Output To option and select where you would like to save this video clip we’re rendering and exporting.
Import clip(s) into Premiere Pro

Open Premiere Pro and create a project and then go File>Import and choose the video file that we just rendered out from After Effects.
Create new sequence from video clip
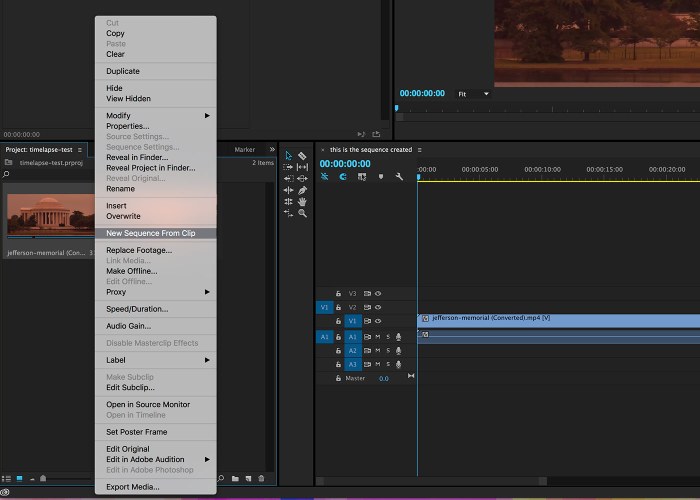
Find that clip in your Project panel and right-click on it and choose New Sequence From Clip and Premiere will create a sequence that will exactly match your frame size and the frames per second of the clip that we just imported.
Edit your video as you wish and then export your video!

At this point all you need to do it add music ad cut your timelapse film and do that basic editing as you wish with your footage to create your timelapse masterpiece. Go File>Export>Media to export your clip as it’s final video form and share it on YouTube, Vimeo, or your preferred video social website.
Leave a Reply